Stack and Heap

.NET offers a managed memory system. This is just a short way of describing a system which handles and manages the RAM memory in its own specific way.

.NET uses a stack and a heap to store all the information required for a program to run. The two components work together to enable a program to run.

Stack

The stack is a memory container in which .NET stores all the value types. Each time a value type is used, it will be added (aka pushed, if we use the stack terminology) to the stack until it gets out of scope (a method execution is finished) and gets deleted (aka popped). A value type can be standalone (an int) or a link (aka pointer) to a reference type.

The stack memory is dynamic, meaning that each time a value type is out of scope, the memory allocated to that type is freed and the stack cleared.

Each time a method is called, all the variables will be present in the stack until they are out of scope. If reference types are used in the method, there will be pointers to the reference types present in the heap) .

The stack also contains all the calls which are made to different methods, also called the call stack. The list of all the calls which are made is also known as the stack trace.

Being a stack,  all its members are added/removed following the LIFO order (Last In First Out).

The stack is faster than the heap but more limited from the memory point of view (a lower number of types in stack than in heap).

Heap

The heap is also a memory container in which .NET stores all the reference types. Value types usually link to a reference type, in other words they reference an instance of an object, thus the name referenced types.

The heap is slower than the stack, but much larger in size, so it can hold more instances.

A reference of an instance can be lost at some point by design (out of scope, setting it to null) and then referenced type remains isolated in the heap waiting for the Garbage Collector to destroy and release the allocated memory. We’ll get into the details of Garbage Collector in a future article.

Code examples

Let’s take some practical examples to better understand how the stack and heap work together.

Value Types

Consider the following code:

int i = 5;

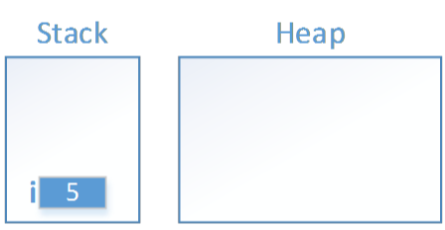
We used a type value and assigned its value to 5. The stack will contain the i variable with the value of 5. The heap will be empty since we only used a value type. So we will have something like this:

stack

Reference Types

Consider the following code:

class Person
{
  public int Age {get;set;}
}

class Test
{
  static void Main()
  {
    Person ceo;
    ceo = new Person();
    ceo.Age = 27;
  }
}

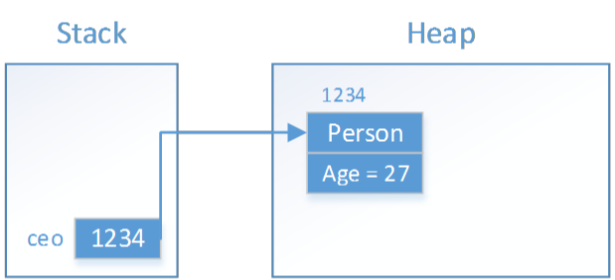
We have a variable, ceo which is of type Person, so this will go in the stack. At this point in time we have no referenced types instantiated so the heap is now empty.

Then we instantiate ceo by using the new keyword. At this point in time, an object of type Person is created in the heap because it’s a referenced type. The memory allocated for the instance of Person is that of one int which is  set to the default value of int, 0. There is no pointer from the variable to the instantiated object yet.

After we instantiated Person type using the new keyword, we assign its value to the ceo variable by using the equal operator. It is now the point when the variable is linked to the actual instance by using a pointer.

We then set the value of Age to 27, so the Age will get updated in the heap.

So we will have something like this:

heap

The variables in the stack are linked to the referenced types through a pointer, which is just a link to a dedicated memory called memory address. This memory address is represented by numbers. In our case, the referenced  type was created on the 1234 memory address. Our variable,  will only know that it’s represented by whatever is in that memory address.

Example 1

Let’s take another, more complex example:

class Person
{
  public int Age {get;set;}
}

class Test
{
  static void Main()
  {
    int age; //step 1
    age = GetAge(); //step 7
    //step 8
  }//step 9

  static int GetAge()
  {
    Person ceo; //step 2
    ceo = new Person(); //step 3 and step 4
    ceo.Age = 27; //step 5

    return ceo.Age; //step 6
  }
}

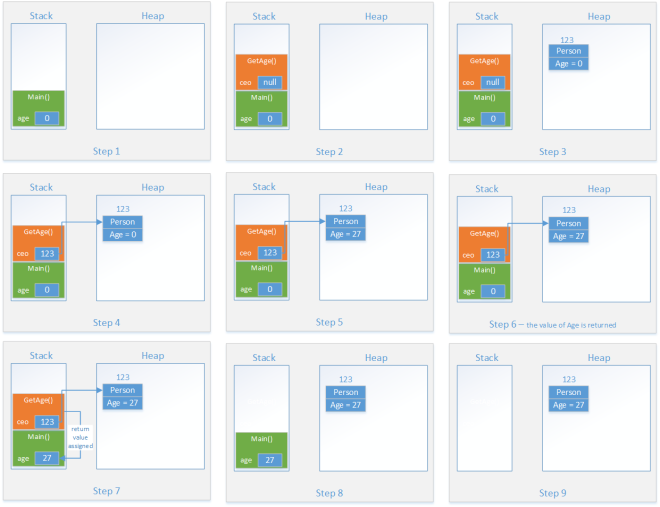
Step 1: value type age is pushed to stack with the default value of 0;
Step 2: we call a method. Stack keeps track of all methods called and allocates space required for all operations in method until it goes out of scope. Therefore we will have ceo variable added to stack with the default value of null;
Step 3: we instantiate the Person type, a new referenced type is added to the heap. The object has just an int so memory will be allocated for one int only in the heap. The int takes the default value of 0;
Step 4: Since we assign the new reference to the variable, the pointer between the two is created and therefore are linked (123 is the memory address of the pointer);
Step 5: age is set to 27, the int in the heap will be updated from 0 to 27;
Step 6: the age is returned by the method;
Step 7: the returned value is assigned to the value type;
Step 8: GetAge method is out of scope so all required memory will be cleared from the stack. At this point, we no longer have a pointer to the instance of type Person in heap. The instance remains in heap until GarbageCollector will remove it and release the used memory;
Step 9: Main method gets out of scope, thus all the used memory allocated for it is released from the stack.

So we will have something like this:

stack and heap

Note that GarbageCollector will remove all unused objects from the heap at some point, but the exact time is arbitrary, unless GarbageCollector is implicitly called.

Example 2

Let’s take a final and interesting example:

class Person
{
  public int Age {get;set;}
}

class Test
{
  static void Main()
  {
    Person person; //step 1
    person = new Person(); //step 2 and 3
    person.Age = 27; //step 4
    
    Person anotherPerson; //step 5
    anotherPerson = new Person(); //step 6 and 7
    anotherPerson = person; //step 8
    
    anotherPerson.Age = 29; //step 9
    
    Console.WriteLine(person.Age); // prints 29
  }
}

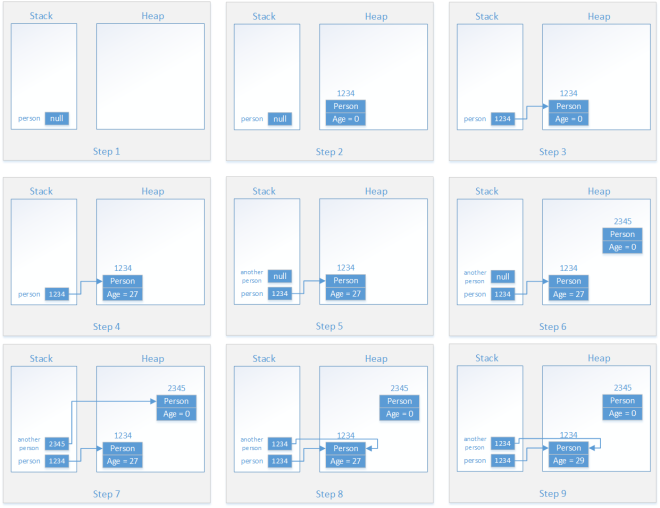
The above example prints 29. But why is that? You’d expect to print 27, right? Let’s take a look about what happens at the memory level.

Step 1: person variable is pushed to the stack;
Step 2: new Person object is instantiated in the heap with the new keyword. The Age property is initialized with the default value of 0. The memory address is 1234;
Step 3: variable person is assigned the reference of the newly instantiated object Person. The link is created between the two using a pointer with the memory address of 1234;
Step 4: the Age property is set in the heap to the value of 27.
Step 5: we create another variable called anotherPerson which is pushed to the stack;
Step 6: another object of type Person is instantiated in the heap since we used the new keyword. The reference has a memory address of  2345;
Step 7: variable anotherPerson is assigned the reference of the newly instantiated object Person from the heap. The link is created between the two using a pointer with the memory address of 2345;
Step 8: this is the interesting part. anotherPerson variable is assigned another memory reference, the one of person. So the initial pointer with memory address of 2345 is replaced with the other pointer from the person variable which points to the memory address of 1234. So both variables point to the same instance in the heap. The instantiated object with memory address 2345 is left orphan and is ready to be handled by the GarbageCollector;
Step 9: We change the value of the Age property in the heap from 27 to 29. Keep in mind that both variables now reference the same object in the heap. In other words, person and anotherPerson are now one and the same thing. This is why when we print the Age value of person we will get the value of 29.

This is what graphically happens in the heap:

same object reference

For more information check out Jamie King’s videos, they are super easy to understand and cover more scenarios.
Chapter 5: Candy-Machine Interfaces

  • make it hard to ignore important details by making them explicit in the design;
  • create interface that are easy to use and understand;
  • return values must not carry error codes;
  • look for and eliminate flaws in your interfaces so others don’t follow your mistakes;
  • use single responsibility principle for methods, don’t write multi-purpose methods;
  • define explicit method arguments. Consider how others will call your method. Think about the method’s purpose and if it makes sense to call the method with an odd value. If it makes sense, the odd value should be treated differently in the method, otherwise don’t stress about it, just assert it;
  • write methods which cannot fail if they are given valid inputs;
  • examine your interfaces from the caller’s point of view;
  • make the code intelligible at the point of call by using proper arguments. Avoid using boolean and magic number arguments, this is usually a smell of the method having two purposes instead of one and usually ends up in splitting the method in two others;
  • comment code to emphasize a potential hazard if the hazard cannot be removed. Comment odd cases and what to be careful around, but again, only if the hazard cannot be removed. Comments should not be an excuse to write poor quality code;
  • the devil is in the details. Write everything as clear and obvious as possible.

Chapter 4: Step Through Your Code

  • the best place to look for newly introduced logic bugs is in the new or changed code;
  • it’s best to test new/changed code by setting a breakpoint in the new/changed code and stepping into it with the debugger. This way you can be sure the new code is actually executed (not skipped by some weird business logic for example);
  • every code path should be checked using the debugger and stepping into the code. Usually, the error handling cases have more bugs because that code path is rarely used;
  • a fast way to force an error and test the error handling cases is to step into the code with the debugger and forcing/setting the desired value to some variable to make sure the code will follow the path you desire to test. Even though it’s common sense how to do it, most people don’t (unless they hunt a bug);
  • danger zone: ||, &&, ??, ? operators. Why? Because the debugger will evaluate two conditions in a single step. Use debugger (immediate window) to analyze both conditions to check if they are as expected. Due to the short-circuit evaluation of the || operator for example, if the first condition is true, the second condition is not even evaluated. If in some cases, the code relies on the second condition to do something, and if the second condition was never tested, a bug might come up. So always check both code paths.

Chapter 3: Fortify Your Subsystems

  • look at your subsystems and ask yourself how likely are other programmers to miss-use them. Add assertions and validation checks to catch hard to spot and common bugs;
  • remove random behavior to force bugs to be reproducible;
  • destroy garbage data/objects in order for them not to be misused;
  • look for rare behaviors in the program and try to make them happen more often (even in the debug versions of the code with directives). A rare behavior might have a bug which is not easily noticed because the behavior itself is rare. This kind of bug can be very difficult to track down. If one were to make this behavior execute more often, there is a good chance that the bug will be discovered eventually;
  • all implementations should be well thought keeping in mind whether a possibility either generates or helps finding bugs;
  • nothing should be arbitrary. Analyze all options for as long as you need before taking a decision;
  • for each design you consider, ask yourself how can you thoroughly validate it. If the implementation is difficult or even impossible to test, seriously consider a different design even if that means trading speed/size for the ability to test the system;
  • the debug version is not shipped, you can do whatever tests you want in the debug version. Even if it’s slower, if there is a chance to catch a bug before the code reaches production, it’s a win-win situation for everybody;
  • if debug code is about to be tested by somebody else, warn them about the code being loaded with internal debug checks which affect performance;
  • don’t apply ship version constraints to the debug version. Trade size and speed for error detection.

Blogging and OneNote

OneNote is a great application developed by Microsoft which helps the user to easily take and organize notes. The tool offers a lot of customization and formatting options. Furthermore, the tool is now almost free. I say almost, because there are a couple of features which are not available, unless paid for.
However, I find those features not to be so important for most of us. Read more about the limitations of the free version.

I must confess that I was using OneNote on the company computer to take a few notes and I haven’t really poked around to see the apps full potential. It has many great features from file attachments, inserting spreadsheets or diagrams, support for scanning, cloud storage, content sharing and many, many more features I’m sure I haven’t yet discovered, but I do so intend to.
Did I mention it’s cross-platform? Even though there are some limitations on the Mac version, it’s still pretty cool.

Since I’m now taking notes of all the development books I’m reading, I thought it would be nice to keep a copy of the notes locally, nice formatted in a document, not just on the blog.

Who knows, maybe I’ll want to change the blogging platform in the future and I don’t want to be dependent on WordPress to export my own content. Also I wouldn’t want to reformat the content again. So the cloud storage (in OneDrive) OneNote offers was definitely a feature which attracted me to using this tool.

However, what does blogging have to do with OneNote? I was blown away of this feature which I learned was available for some time now, but I don’t know how many know about it and how many are actually using it.

So, you can actually write and format your blog post from OneNote and publish it to your blog. How cool is that? You’ll have to first configure your blog account. It supports out of the box integration with most popular blog platforms (WordPress included), but you can also add a custom blog provider, the only limitation here is that the provider needs to use the MetaWeblog API. I’m currently writing this post from OneNote.

This was exactly what I was looking for: create well formatted notes, save them in the cloud to make them available from everywhere, post note to blog and keep a copy to yourself + it’s cross-platform.

Unfortunately, there are some limitations to this awesome feature which I hope to be resolved in the near future:

  • You need both OneNote and Word for this post to blog feature to work. You’ll have to write your post in OneNote, go to File -> Send to Blog. Word will open up with the content from OneNote. From the Blog Post tab, you hit Publish, enter the credentials for your blog and it’s done. So, since Word is not free, it’s kind of a bummer for most of the people. I really hope Microsoft would integrate this feature directly into OneNote in the future as I don’t see the point in needing Word just to use the post to blog feature;
  • Another limitation is that you cannot add the category, tags, permalink and other WordPress related features. You’ll have to add these details after the post was published. However, I see this limitation as a minor one, as long as the post gets published to the blog well formatted, I’m fine with adding the other details later.

Happy blogging from OneNote!


Chapter 2: Assert Yourself

  • assertions (not to be confused with Unit Test Assertions) are neat way to validate the data your code works with in order to determine potential corrupt data as close to the time of the corruption itself. Read more about Assertions vs UnitTest Assertions;
  • preprocessor directives (#if DEBUG) are old school and I wouldn’t use them unless a critical situation arises (and even then I would probably use it temporarily). I find them to be messy, make code harder to read (not clean code);
  • don’t make/rely on assumptions (assumption is the mother of all fuck-ups). Remove them or test them.
  • defensive programming usually hides bugs and should be avoided. However, if really needed for some reason, make sure to test even the most defensive programmed part you wrote.
  • execute debug code in addition to, not instead of ship (aka release) code/configuration;
  • keep an eye of opportunities to validate the results a method returns. Bottlenecks are pretty good methods to look into;
  • be sure to use a different algorithm (not another implementation of the same algorithm) to validate the results to increase the chance of finding bugs in the actual algorithms;
  • it’s not a tester’s job to test your code, this is your job;
  • when noticing something risky in the code, try to think what can you do to catch a potential bug in that specific area, automatically, at the most early stage. This exercise will translate in finding many ways to make the code more robust and therefore safer;
  • when you start using assertions, most of the times the bug counts will climb dramatically. This can alarm people and make people uncomfortable if they are not aware of the assertions (even if it’s for the greater good). So always warn your colleagues that the number of bugs could be increasing after using assertions;
  • assertions should be kept forever and not stripped out once the code has been released. These assertions will help in the future when new features will be added in the next version;
  • use assertions to catch illegal conditions which should never arise. Do not confuse these conditions with error conditions which must be handled in the final product.

Chapter 1: A Hypothetical Compiler

  • enable all optional compiler warnings to see from the beginning if the code starts to slip;
  • enable FxCop to avoid compiler-legal code which is likely to be wrong (ex: not using the disposable pattern on an object which implements the interface);
  • always compile and run unit tests before checking in even if the change was trivial (even if it was just a refactoring with no new written code);
  • find bugs as early and easily as possible.

Conclusion: you want to catch the bugs automatically, at the earliest possible stage without relying on someone else’s skills.